Bluehost MX Record Setup
 MX Guarddog can automatically configure your MX records using our cPanel Sync service (Bluehost uses cPanel with a custom interface). Instructions below are for Bluehost customers who wish to make the changes manually.
Step #1
- Ensure you have added all your email addresses, forwarding and mailing list addresses with MX Guarddog. You must define all email addresses at your domain.
- Login to your Bluehost interface for your domain.
Step #2
-
Click MX Entry from the Mail group.

Step #3
-
Under MX (Mail Exchanger) delete the existing MX Records (you will be adding new records in the next step).

Step #4
-
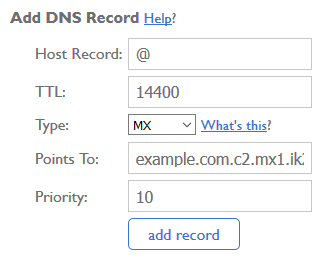
At the top of the page you will find a section called Add DNS Record. Use that form to add new DNS Records, following the example below. You can find your personal MX record settings in the chart below (you should be adding 3 records in total). Ensure you add Type: MX, Host Record: @, Points To: (MX Server Name from the chart) and Priority can be taken from the chart below.

MX records are specific to individual domains, please login to view the MX servers for your domain.
Step #5
-
Under MX (Mail Exchanger) section you will find and Email Routing: link, click more >> to reveal the options.

-
With the options now showing, select Local Mail Exchanger and click change. This will ensure Bluehost continues to accept your mail after you have changed your MX records. If you fail to set the value to Local Mail Exchanger, Bluehost will no longer accept mail for your domain, resulting in errors when we attempt to deliver your mail.

Setup Complete
You should end up with three MX Records which direct email for your domain to our servers. We will process and forward clean mail to the server you specify on the Your Email Servers page.

Your MX records are now configured, your email will be protected by MX Guarddog. Changes to your MX records may take 24 hours before all computers on the Internet see the update, so your spam levels will slowly decrease during this time.
Once you have been up and running with MX Guarddog for more than 48 hours you may want to implement cPanel firewall to prevent direct delivery attacks at your domain.
Updated 2015/06/14
